
Siraj Sabihuddin
Just posting some old code from 2021 that I created with WIX. Please note, those who use WIX should be aware that WIX is an Israeli company. The Israeli government along with many Israeli companies have been complicit in war crimes and genocide [2][7][8]. There is a BDS boycott on WIX currently [1]. At the time of coding I was unaware of WIX’s origins. I do not know WIX’s involvement in apartheid and genocide. I stand to be corrected if new information comes to light. You have been thus warned.
I need to be honest. From a developer point of view, WIX is kinda NOT amazing. With its Israeli connections and potential unethical business practice, it makes it even less attractive [4][5][6]. This blog post documents my first use of WIX ever in 2021 and my first attempts to utilize the WIX API as well. I did this work before the currently unfolding Israeli genocide of Palestinians as indicated by the UN [2][7][8] and before I was aware that WIX was an Israeli company. I don’t know if WIX and its employees have been involved / complicit in apartheid or genocide as i haven’t been able to assess the situation in detail as of yet. I stand to be corrected if my statements are inaccurate or unfair. I will allow you to make your choice on this. If you must use WIX, note that the goals of this article are as following:
- To create a page (e.g. a publications page) where public white paper access can be limited.
- To create an article embed in a specific page with a “Read More” button. Here the user clicking on the button would have to register before being directed to the appropriate paper in the publications page.
- To provide a registration process that would entail the user entering their email address and other details before they could get access to the paper
- To email the user and provide a link in email to verify and be redirected to the white paper automatically. To provide custom elements in the email such as the paper title, the user’s registered name and a custom link taking them directly to the paper location.
- To provide the user with the ability to access the white paper page without needing to continuously re-verify.
To get through these goals I’ll take you through three versions of the code as I implemented them. The first is probably the simplest. After this first iteration I’ll take you through a more sophisticated evolution and then finally through a final version that is probably the most complete of the bunch.
1. Version 1: Page Access
The figure below (figure 1) provides a flowchart for the first iteration of the code. Here, the main logic of code that follows in this section is outlined.
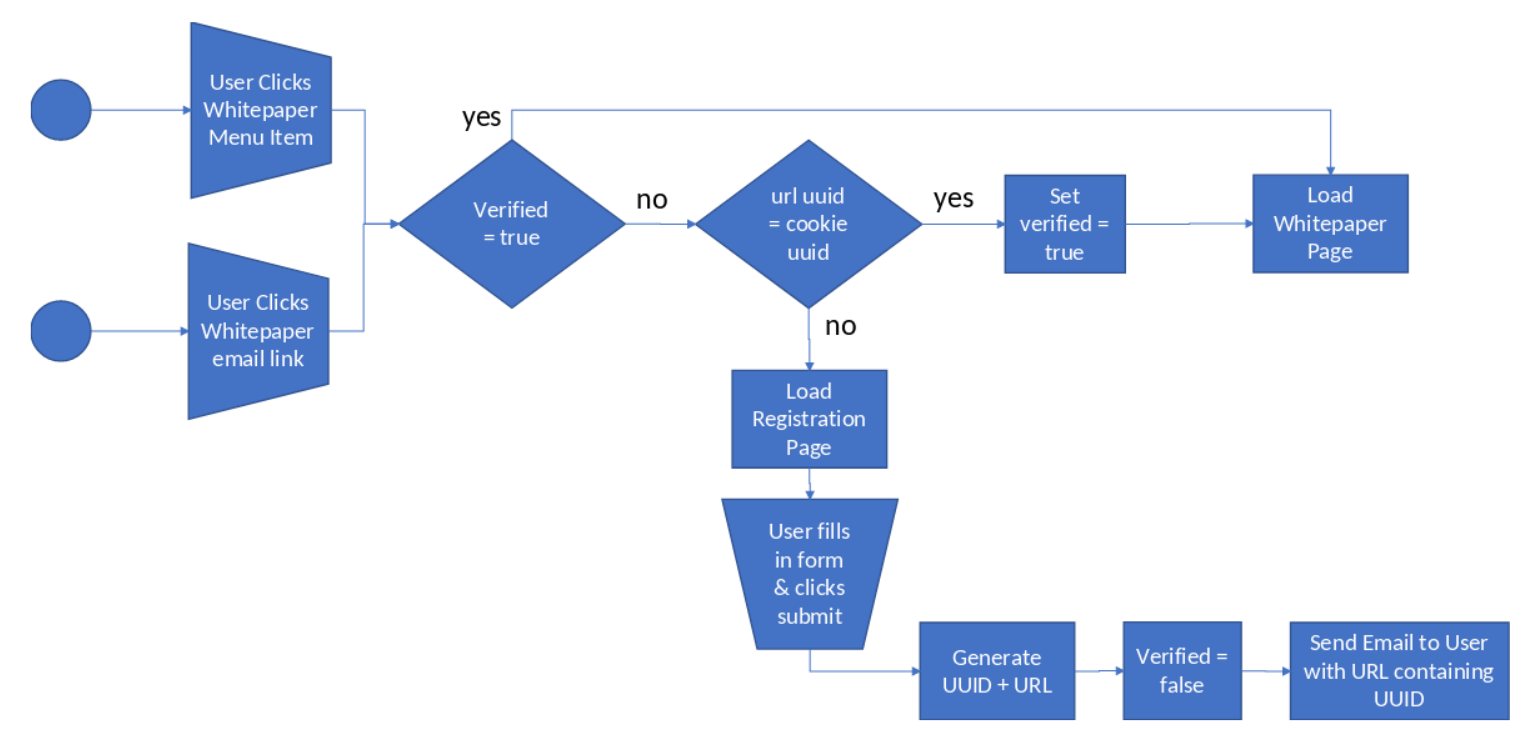
When we click on a button or menu item we must assess where to redirect the user. To do this we must have some knowledge of whether the user is registered (verified) or not and the identity of the user as well. Based on this user state we will decide to redirect the user to the specific URL of the whitepaper / publication page or not.
To do this though we need a way to store some information about the user. There are three main approaches to doing this. The first is to utilize URL Variables, the second is to store information in a user session and the third is to store user information in the form of cookies.
1.1. URL Variables
URL variables directly store this information on the client side in the browser URL directly, for instance in the form as shown: “https://wandering3ngineer.com/wp-admin/post.php?post=3715&action=edit” – This is the URL for this article in edit mode on my word press admin site. In the URL there are two things to note. Namely that the ? mark signifies that a URL variable list has been begun and that the & sign provides a delimiter between variable assignments. The two variables are “post = 3715” and “action = edit”. When the page loads these variables are read by the Javascript code and used to determine what elements should be loaded onto the page.
1.2. Session Variables
Session variables provide server end storage. For instance when the user logs in or does some action the webpage can initiate a server side action to retrieve data for that user from some database sitting on the server. This might be the case, for instance, when the user is logged into a web app. I’m not going to use any session variables in this code.
1.3. Cookies & Local Storage
Cookies and Local Storage (HTML5) are a client side stored variables. These are stored on your computer through your browser and will typically be stored for a period of time specified by the expire date of the cookie before the browser automatically details it. Cookies can persist beyond you closing the browser, i.e. persistent cookies or can be deleted after browser tabs are closed, i.e. session cookies. Typically cookies are stored as a set of key:value string pairs and tend to be quite small and require passing on to other pages via HTTP requests. Local Storage is an alternative to cookies that can be used to store much larger amounts of persistent key:value data that may not be in string format alone. Note that I’ll be using Local Storage and Cookies interchangeably in this article.
1.4. Home Page Construction
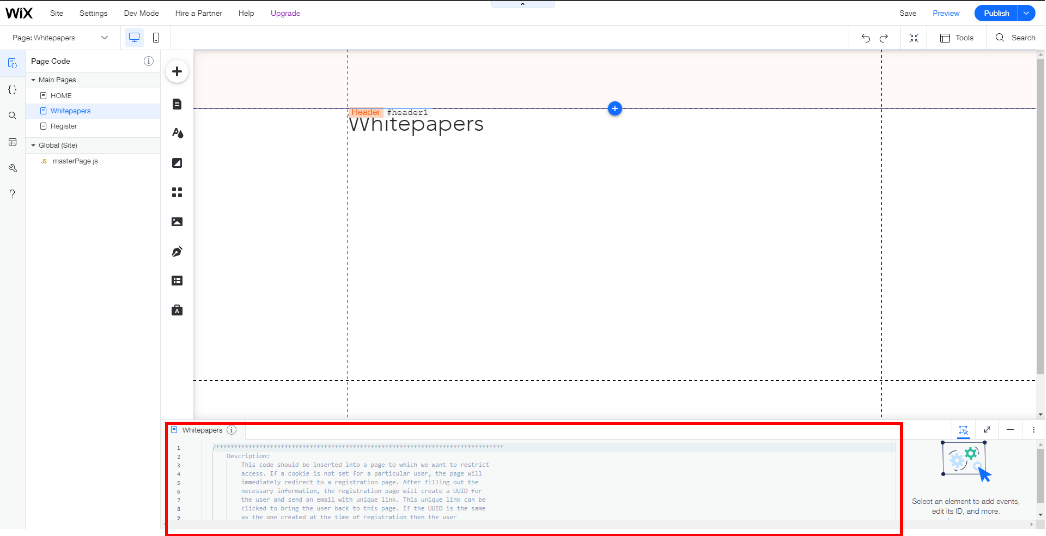
The first step to coding is til build a web page hierarchy. The first page to build is the home page. In this home page I have create a title and a single button that leads to the ‘Whitepapers’ page. In order to do debugging I’ve created an additional section called the ‘Debug Output’ section where I can write debug data and use a button to clear Cookies / Local Storage. The below figure demonstrates this (figure 2).
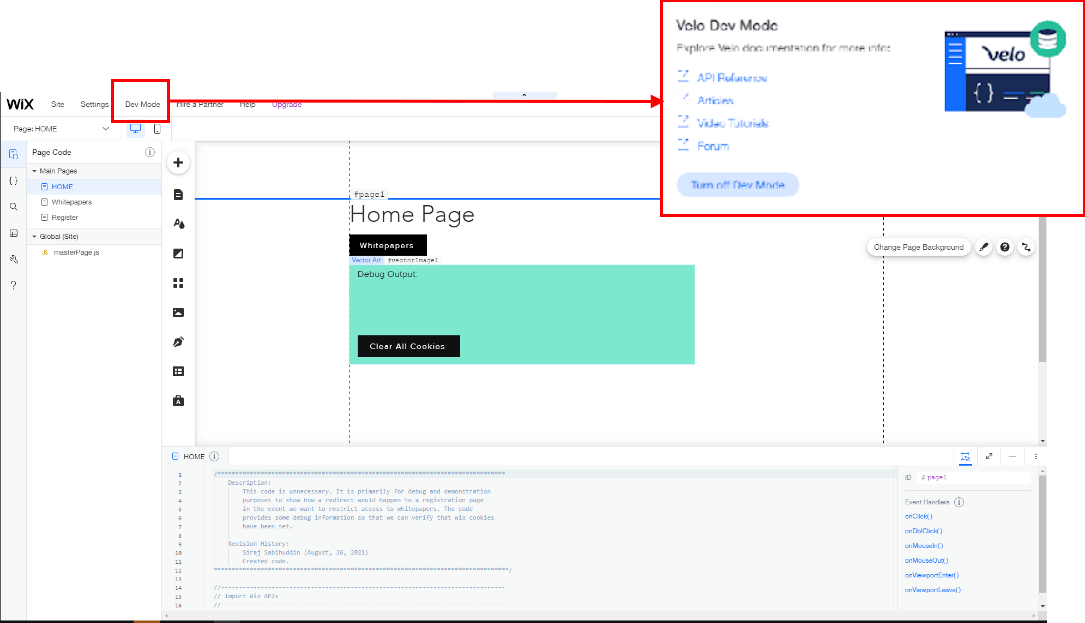
Developer Mode to add code as shown in the top right corner of the screenshot.
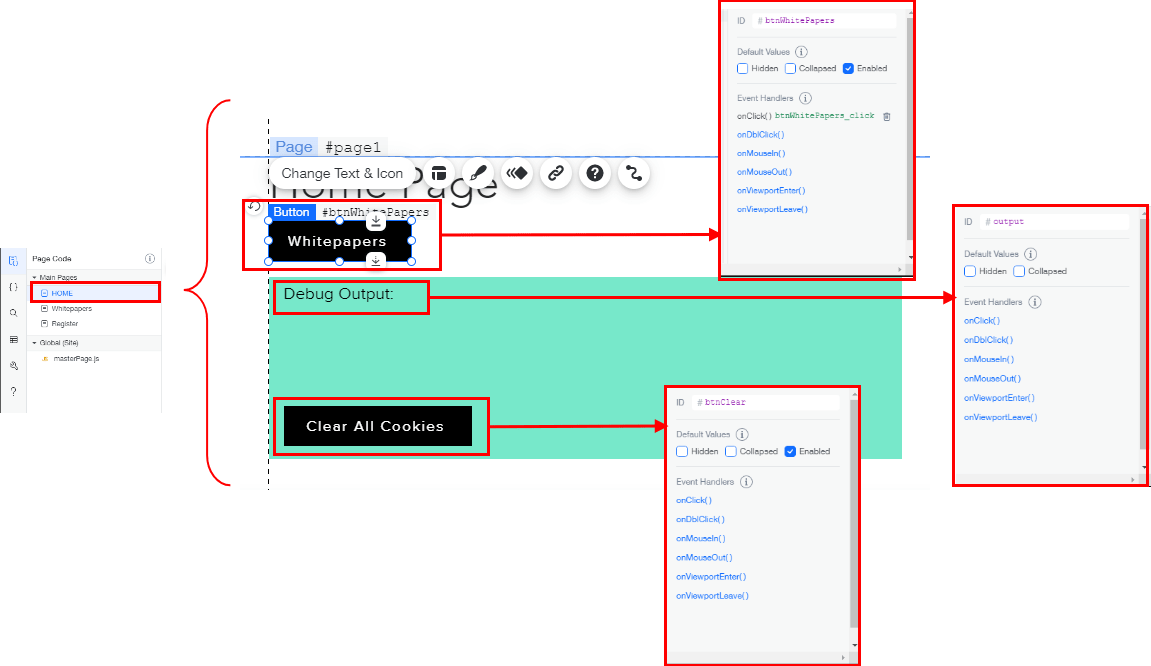
Note that in Figure 2, developer mode must be enabled to add javascript code for the webpage. Note that in order to use javascript (jquery) we need to be able to to select the particular elements that trigger a function call. To do this we can provide IDs for each of the elements we would like to control. In this case that would be the “Whitepapers” button, the “Clear All Cookies” button and the “Debug Output” box as seen in figure 3 below.
Now that this basic webpage construction is complete, its time to write some JQuery code. First the relevant WIX APIs are imported to provide local storage (cookie) functionality (wix-storage) and to provide URL redirection and parameter search (wix-location). This is followed by the onReady() function that is called when the web page is being retrieved. Within this function the event listeners are prepared for the two buttons on the webpage. The code below demonstrates this and should be copied and pasted into bottom code panel of the dev. mode display of the WIX interface.
1.4. Whitepaper Page Construction
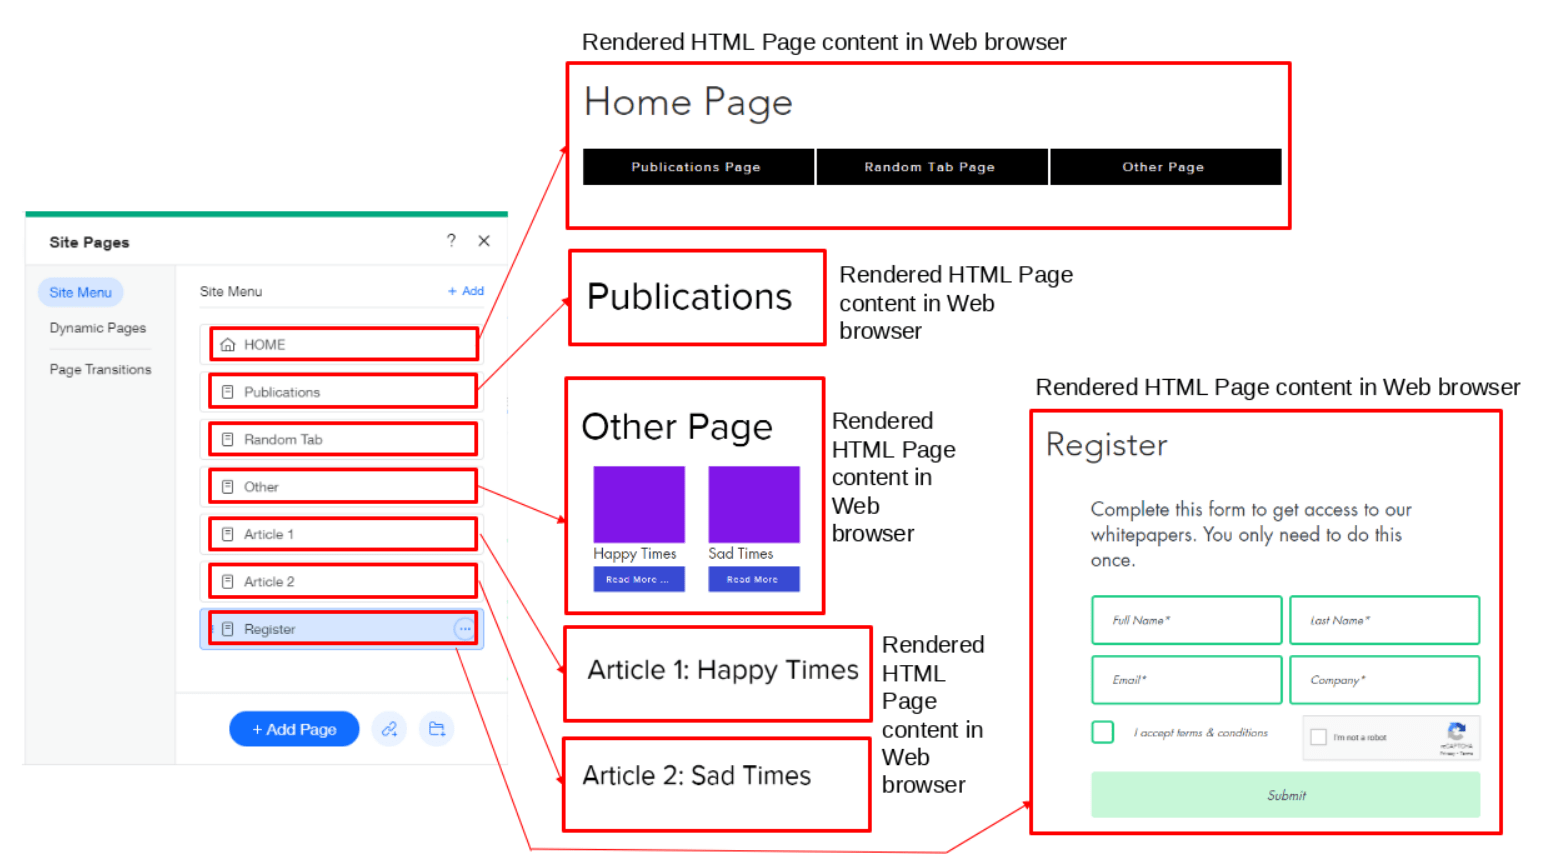
Now that the home page has been built, its time to build the “Whitepaper” page. This page will contain a listing of articles that can be clicked on and viewed. This is shown in figure 4.
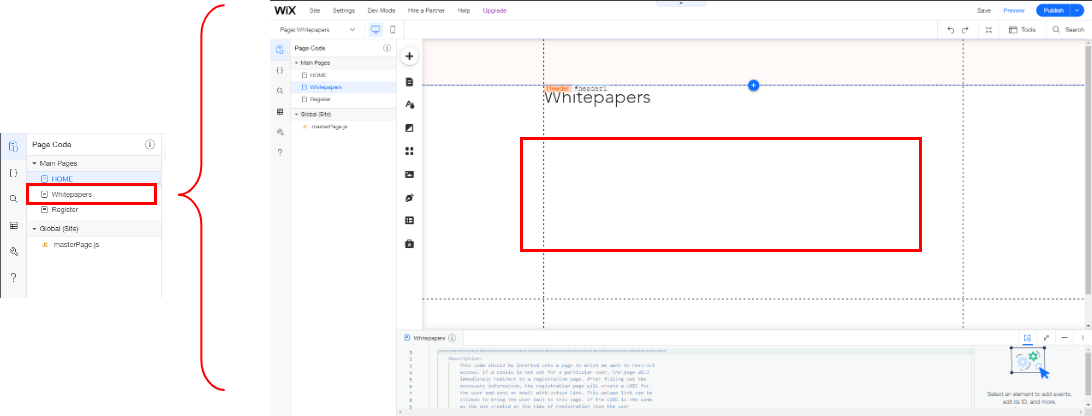
We can now paste the code for the whitepaper page using the WIX dev. mode code as shown in the region highlighted with the red box in figure 5.
Once again, in the code for the Whitepaper page would include some libraries for the local storage variables (wix-storage) and for URL access (wix-location). We would like to call the load() function when the page is ready (i.e. when the onReady() function is called automatically). This is shown in the code below.
The load function is shown below. This function grabs the URL and extracts the variables / parameters, i.e. url_uuid. It then grabs the stored cookie / LocalStorage variables: cookie_uuid and cookie_verified. The first time the user vists the website there will be no url parameters and so cookie_verified and cookie_uuid will both be null. We want to initialize cookie_verified = false as an initial condition. Similarly if we have no URL parameter for url_uuid and if cookie_uuid is not set then we need to do some initialization of the cookie_verified cookie called ‘verified’ in local storage. When the url_uuid is not equal to the cookie_uuid we know that the user needs to register. The same is true if the values are null. The user is redirected to the registration page for filling out email.
1.5. Registration Page Construction
Now its time to go to design of the registration page. Below, in figure 6, is a screenshot. Here we must setup the form.
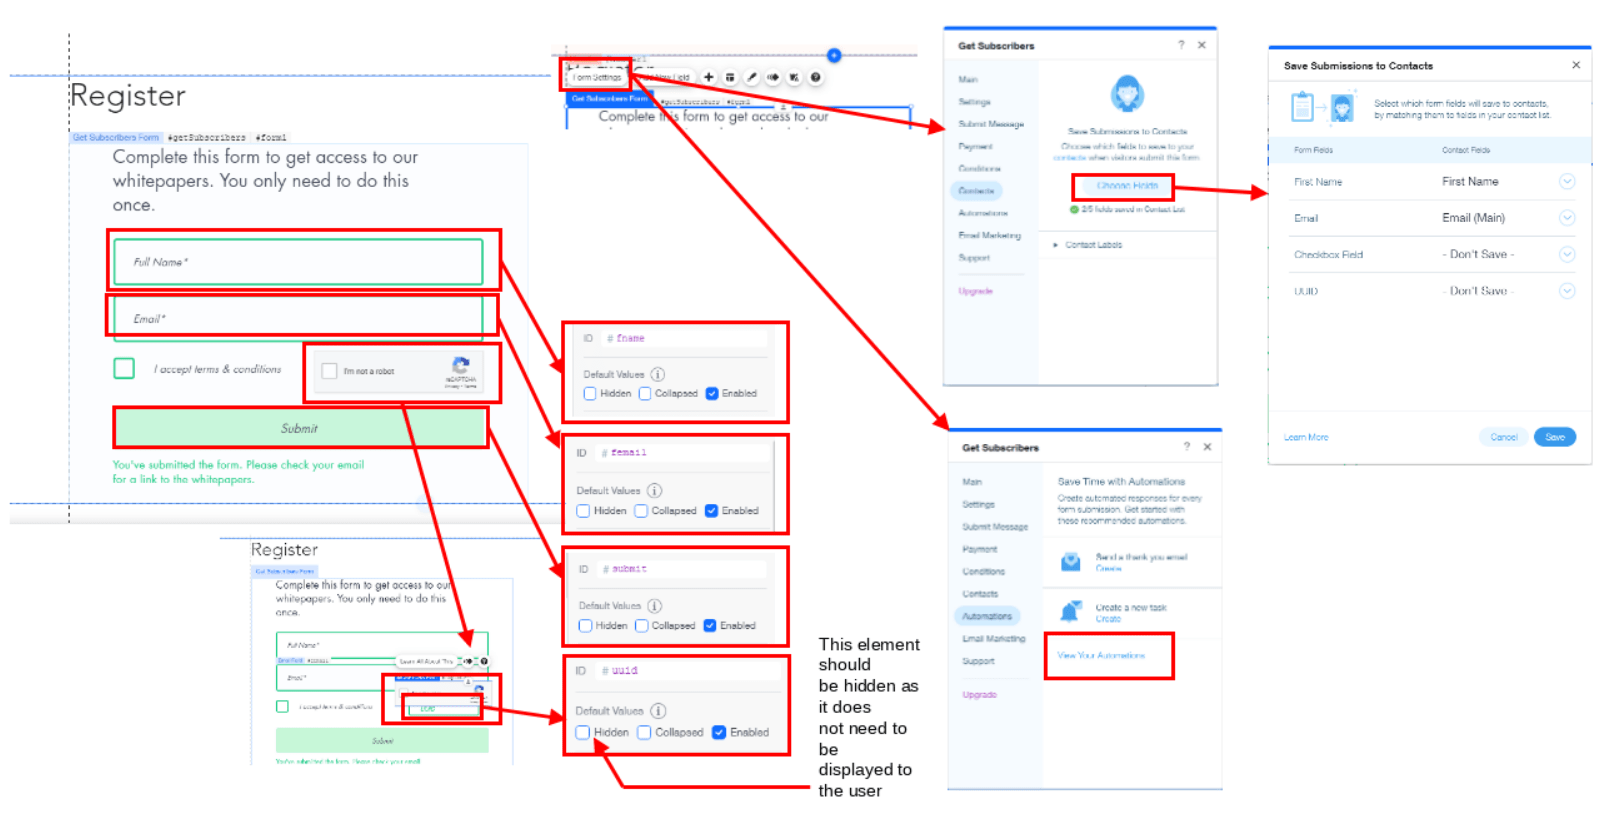
Now JQuery / Javascript code can be added to the page dev. mode coding pane as below. As with other pieces of Javascript code we start with the imports and then proceed to create the onReady() function. We will use the wix-crm library for accessing the server side form database. The onReady() function sets up a button event listener and makes a call to a function called submit().
When the submit button is pressed the submit() function below is called. The function needs to generate a randomized uuid using the generateUUID() function. The resulting uuid is assigned to the cookie_uuid variable and stored into local storage (cookie format). The code will use the form information to create a contactInfo entry into the WIX CRM database on the server. Response from the database will then be used to send an email with a name and uuid customization variable.
As a quick aside, I’ve copied a function for generating a randomized UUID from stackoverflow [3] below. This function will provide the unique user identification in the database / email for eventual authentication purposes via cookie and URL parameters.
1.6. Email Customization and Automations
At this stage we are ready for a final stage. In WIX, we must setup automations to provide an automated approach to sending emails. See figure 7 below where I’ve created an automation called verify.
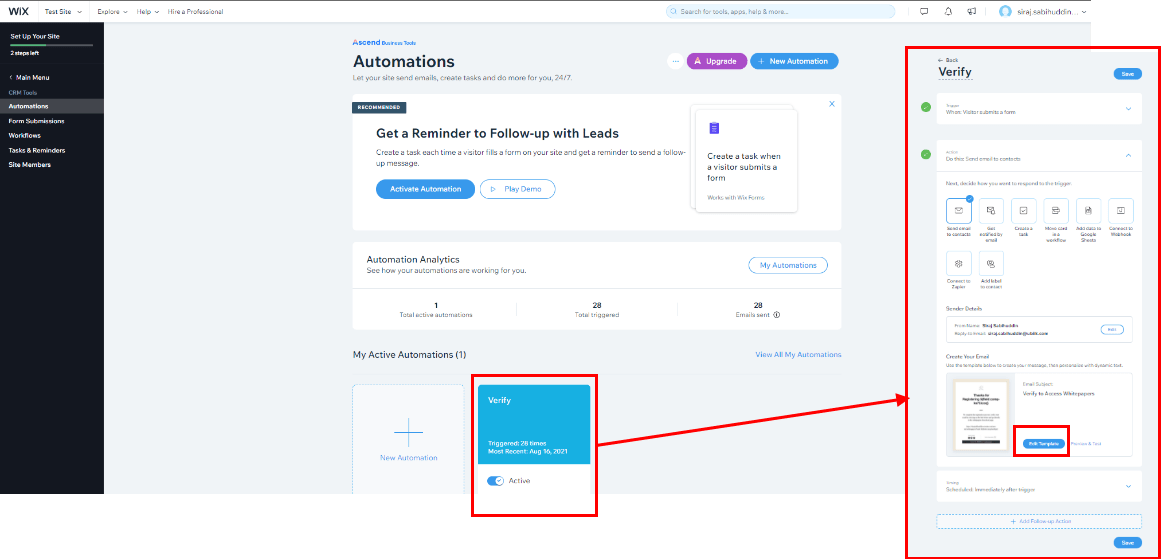
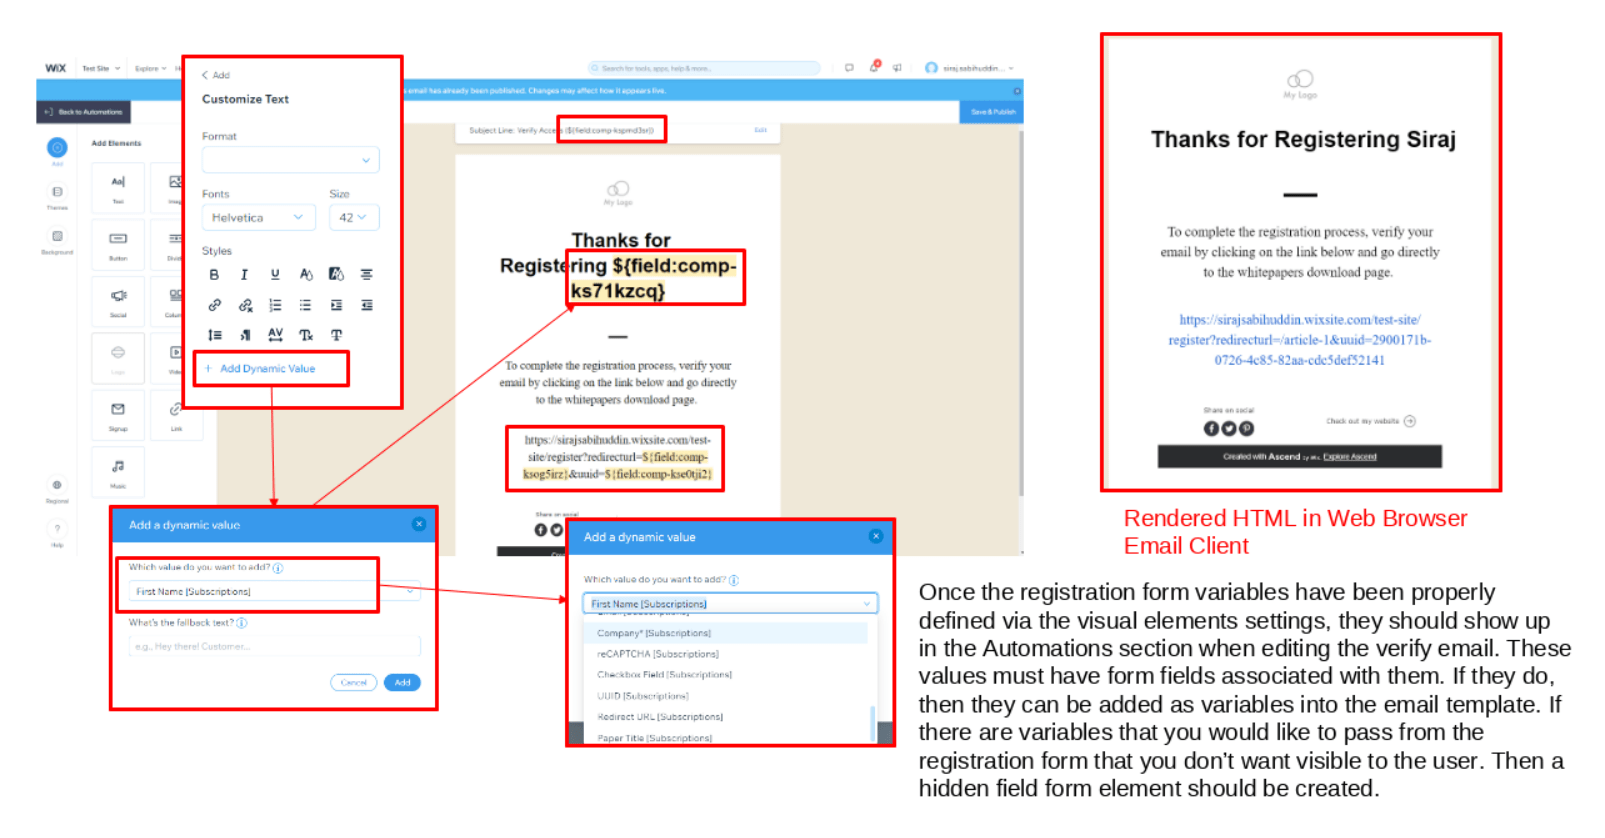
In this automation, I’ve created an email template as shown in figure 8 below. This email template needs to be populated by the user’s name and the a URL needs to be created with uuid parameter set. This uuid parameter will be used by the whitepapers page to determine if the user matches the cookie_uuid stored in his or her local storage. Its a bit frustrating to figure out by trial and error how to do this as WIX really doesn’t provide good documentation and the correct way to enter variable information into the template isn’t really clear.
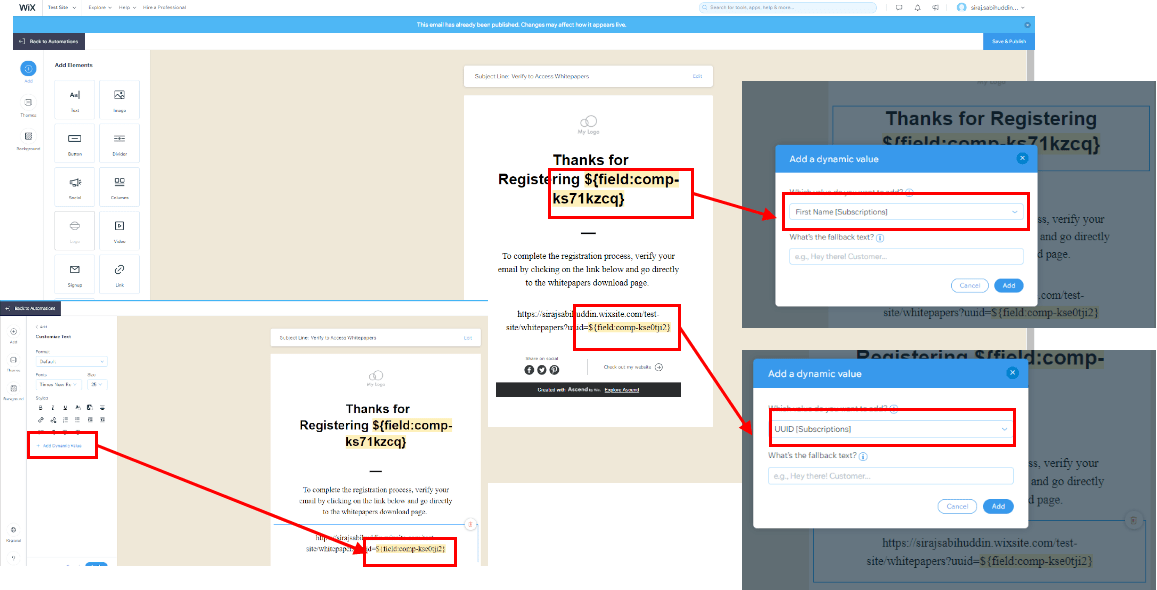
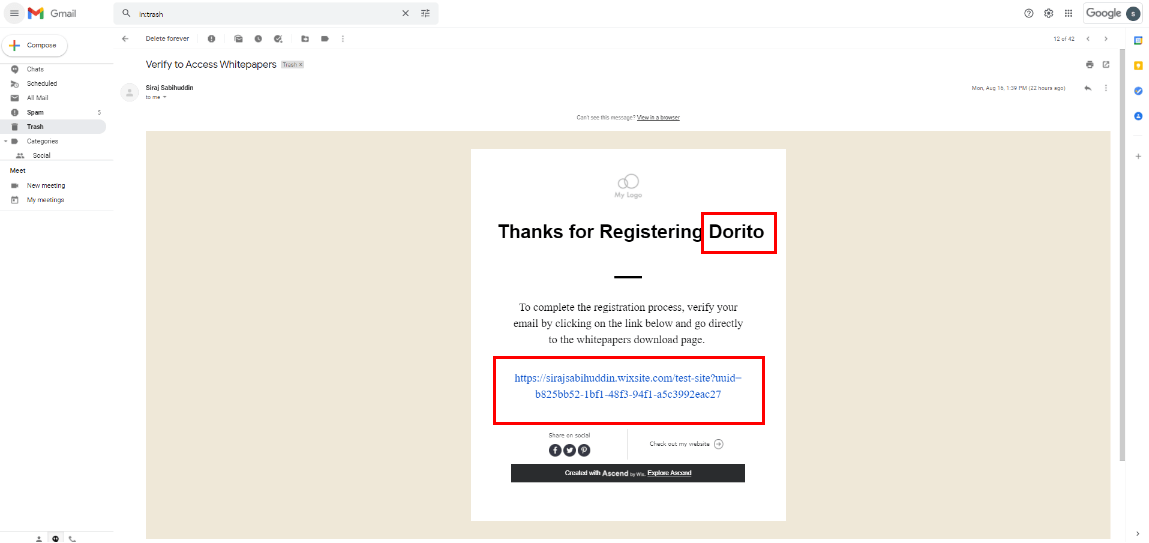
Now at this stage we can actually try to browse to the website home page, click on whitepapers, register using the registration form and see if an email is sent correctly. An example of the resulting email is shown below in figure 9. Below I use a fictionalized user called Dorito with my email address.
And that’s a wrap for version 1 of the code for creating an access limited approach to getting to a “whitepapers” or “publications” page. Next follows a more specific approach that limits access to specific whitepapers instead.
2. Version 2: Individual Articles
In the previous version, I should an approach that could be used to limit access to a publications or whitepapers page. Here the user had to register before being able to access the page and get access to articles. In this version I’ll go one step further and require the user to register when they try to read more of a specific article instead.
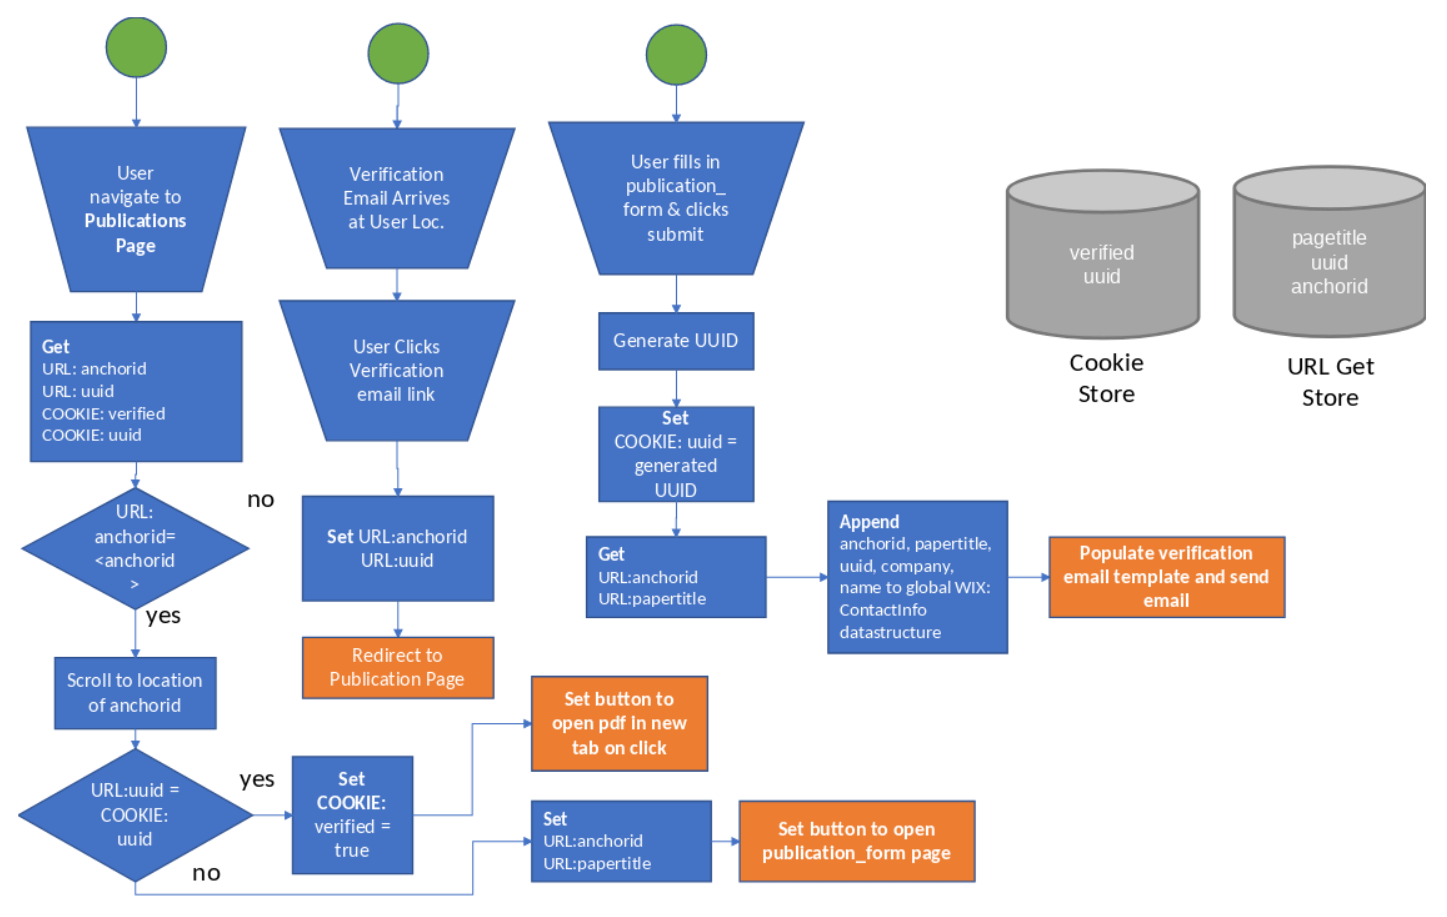
I can now take the previous flow chart from figure 1 and add some more sophistication so that a link from a specific article’s ‘read more’ button can directly redirect the page to a specific URL location or to the registration page depending on whether the user has been registered and verified or not. See figure 11.
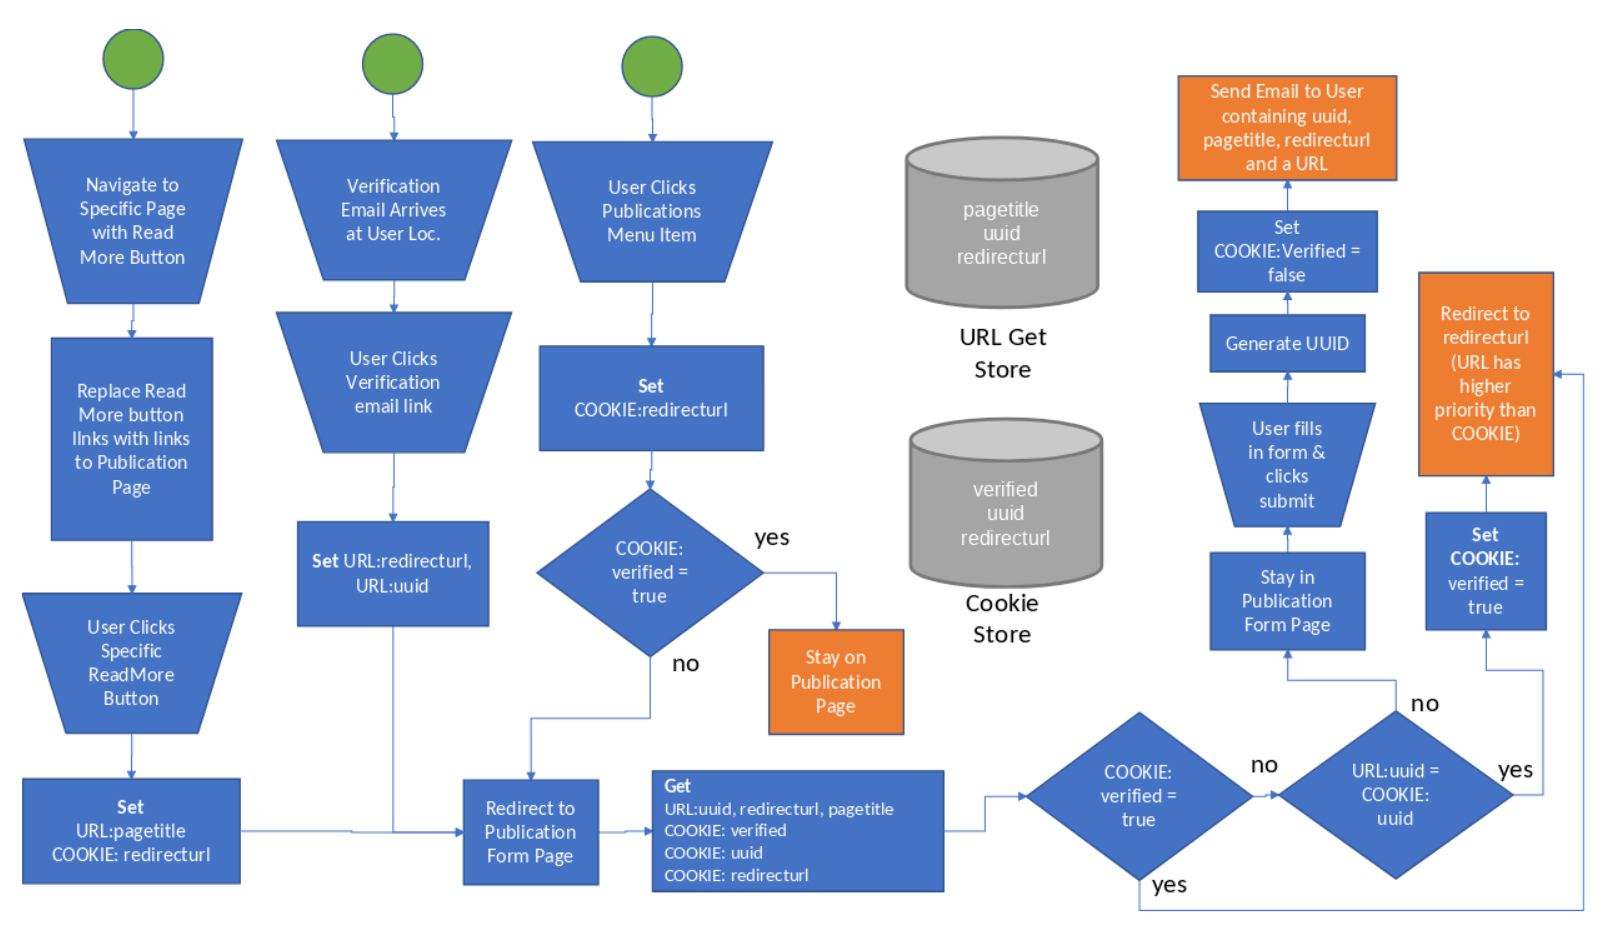
Notice that I’ve shown the variable storage locations as two separate databases. the first is as a URL parameters store (using HTTP GET) and the second as a Local Storage (or cookie storage).
2.1. Public Folder Use
Rather than storing code on a per page basis this time, I pulled out all common code into a separate set of javascript / jquery files and stored them in the WIX public folder as shown in figure 12 below. I then took the public folder code and imported it into the specific page code section (dev. mode) for use with much simpler page specific code.
Its still annoying to use WIX as a developer even with this simplification as it is still challenging to version control page code.
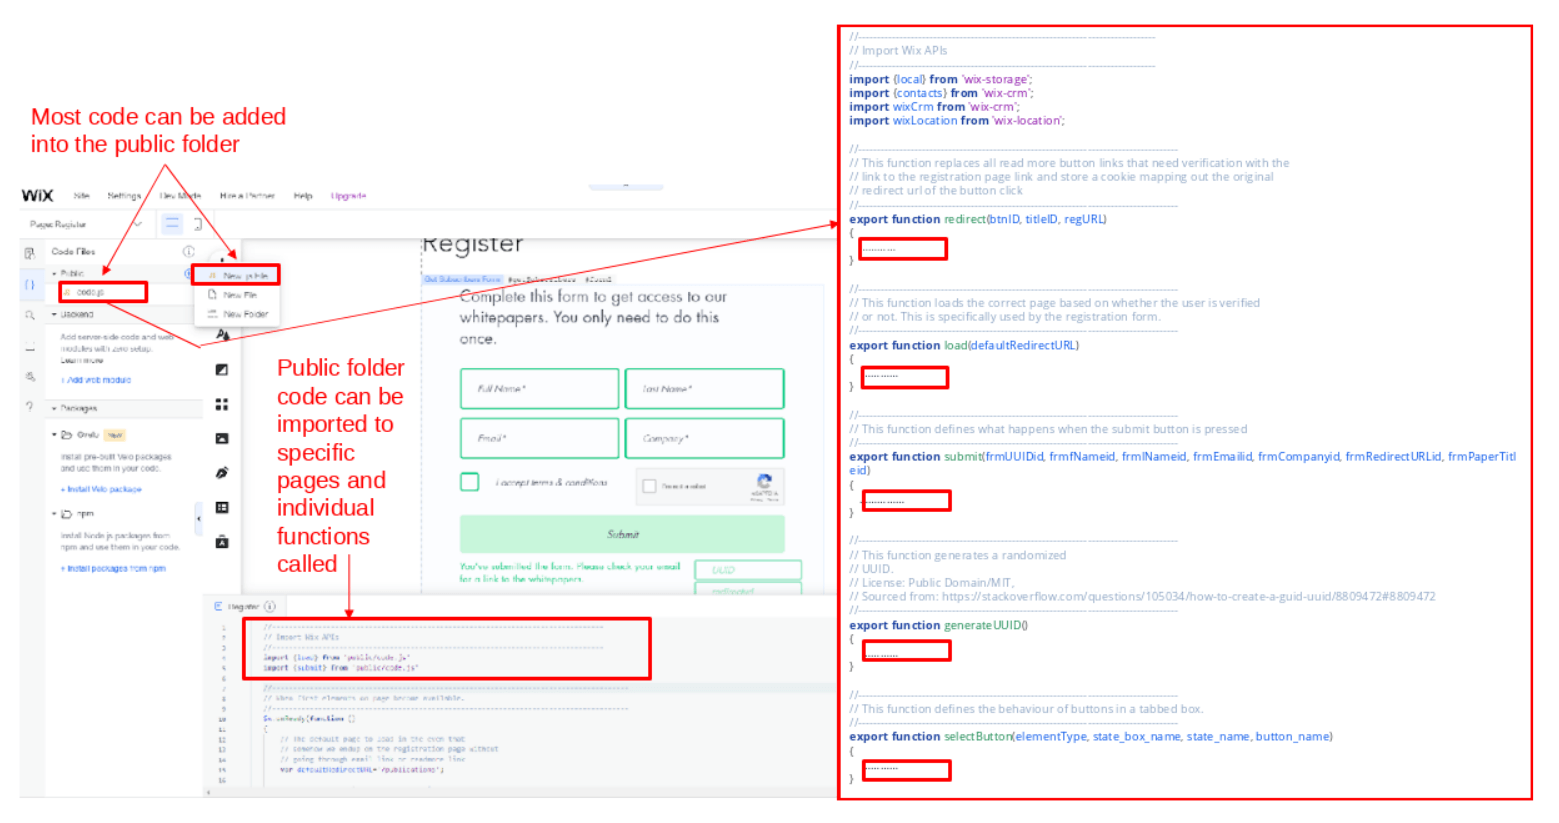
The code below as stored in code.js in a public folder forms this common set of functionality that will be used by multiple pages. The code can be downloaded directly using the button below:
The code is divided into separate functions as follows: redirect(), load(), submit(), generateUUID(). This code provides a method for the user to register for access to the publications. They will be redirected here when they click the readmore button in a page or when they click on the publications page to access whitepapers if they have not been verified to access the page. After completing the information on the form, the user clicks submit. The submission stores the user information in a spreadsheet in the WIX admin portal (server end). There are hidden form elements for redirect url, uuid that are filled by automatically generating a UUID and extracting cookie data for redirectURL. When the user clicks submit this data is filled and then passed on to the WIX admin and used to populate a template email with the correct URL with and UUID variable. This code then sends the email to the person registering and contains a link specially constructed. If the register user clicks on the link in his/her email, it will redirect to the registration form once again where the link details will be authenticated using a WIX cookie and URL parameters. The user will then be redirected to the correct publication related to the original button click. The next sub-sections outline the different parts of code.js code in detail.
2.1.1. Imports
2.1.2. Redirect Function
2.1.3. Load Function
2.1.4. Submit Function
2.1.5. Generate UUID Functions
2.2. The Publications Page
At this stage we can start to look at the code present in each page and contextualize it with any public folder code as well. In the case of the publications page there is no need for any public folder code. When the user attempts to access the page, he or she is redirected to the registration page with a URL parameter indicating the page name from which that redirection happened. In the case that the user is already a verified user, then the user can continue to browse the publication page without redirection. Figure 13 demonstrates.
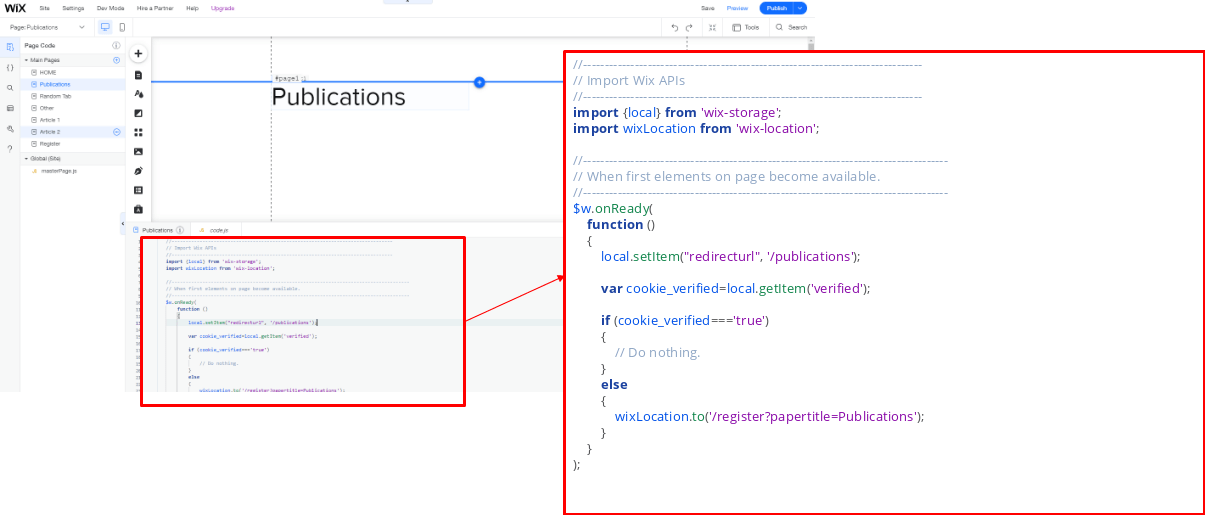
The resulting code on the Publications page is shown in the listing below. Notice that there is one piece of code in the below that I was not able to use because of some WIX related Local Storage / Cookie bug, namely: local.setItem(“redirecturl”, ‘/publications’); .. This may be related to storage limitations. But I’m not sure.
Note that the papertitle URL variable is set to the Publications page as a hack to deal with the bug preventing the storage of the redirect url into a local storage cookie. This will be used to understand which page the user should be directed to after registration.
2.3. Dummy Third Page Construction
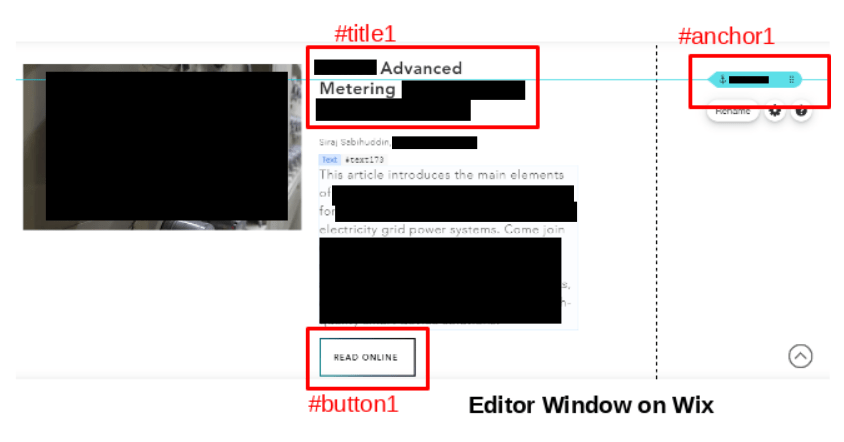
I’ve created an additional dummy page that contains some articles with a “read more” link to simulate another possible user use case. See figure 14 below. Here if the user is verified then the “read more” link redirects to the actual article. If not, then the user is redirected to the registration page and the papertitle stored for later use after registration.
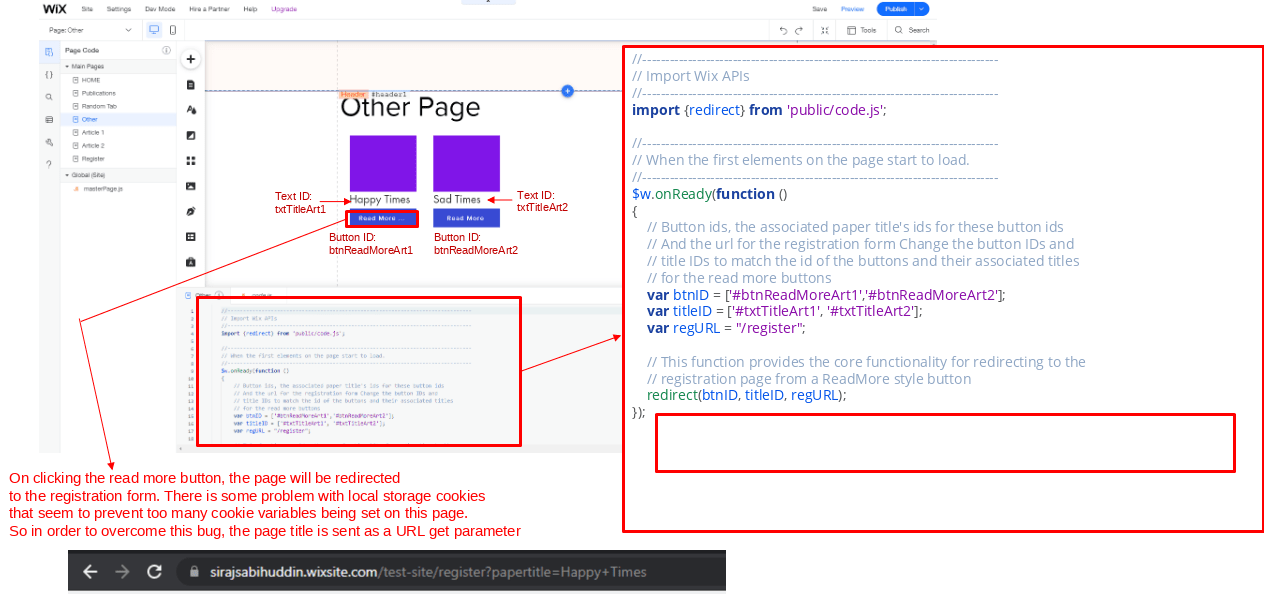
Below is the code that is inserted into the dummy third page (titled Other Page). This code utilizes the existing public folder code called code.js by importing it into the page code.
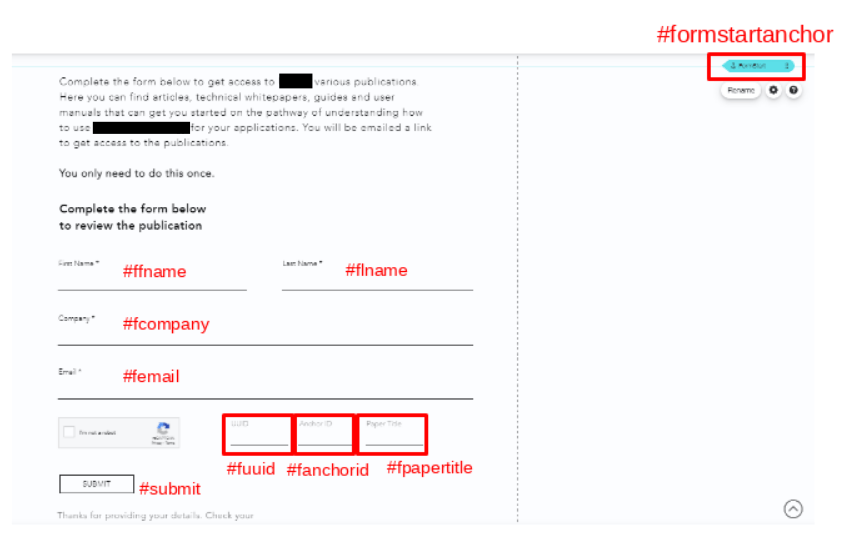
2.4. Registration Page Construction
The below image in figure 14 shows how to setup the registration page using WIX. Each form element is given an ID.
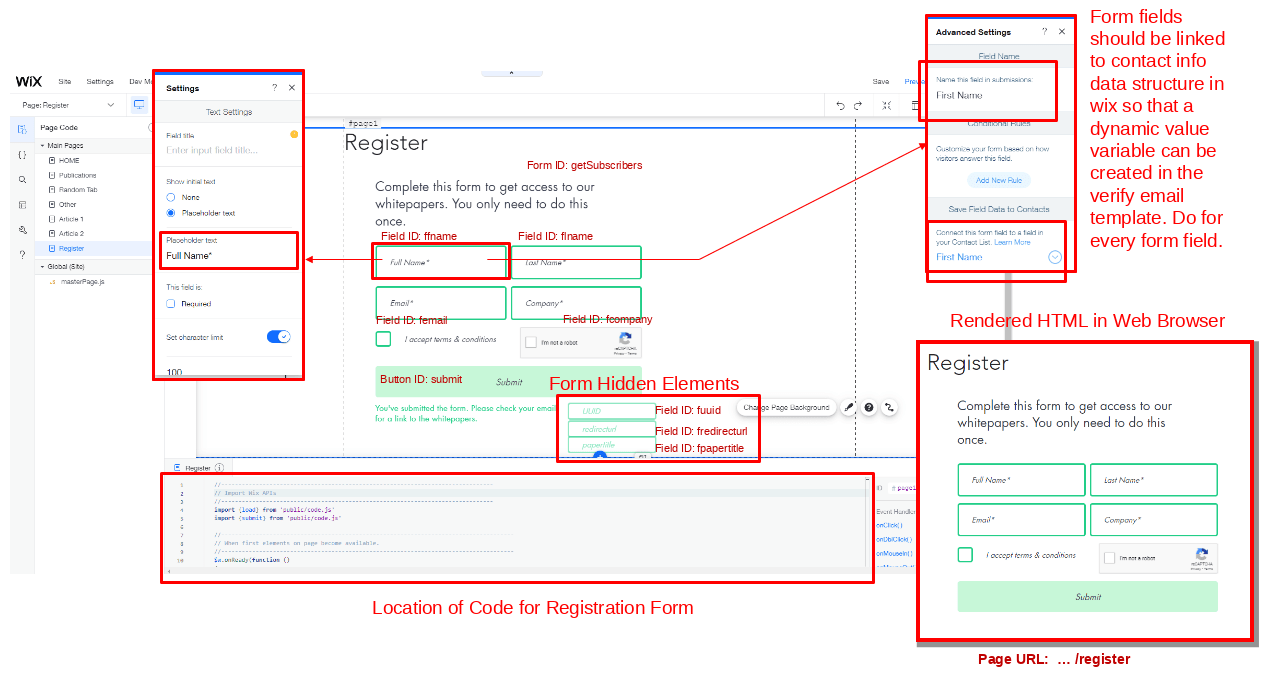
As with the previous pages, only a small amount of code is needed within the page code itself. The bulk of code is imported from the code.js file in the public folder. Figure 15 demonstrates the registration page code insertion.
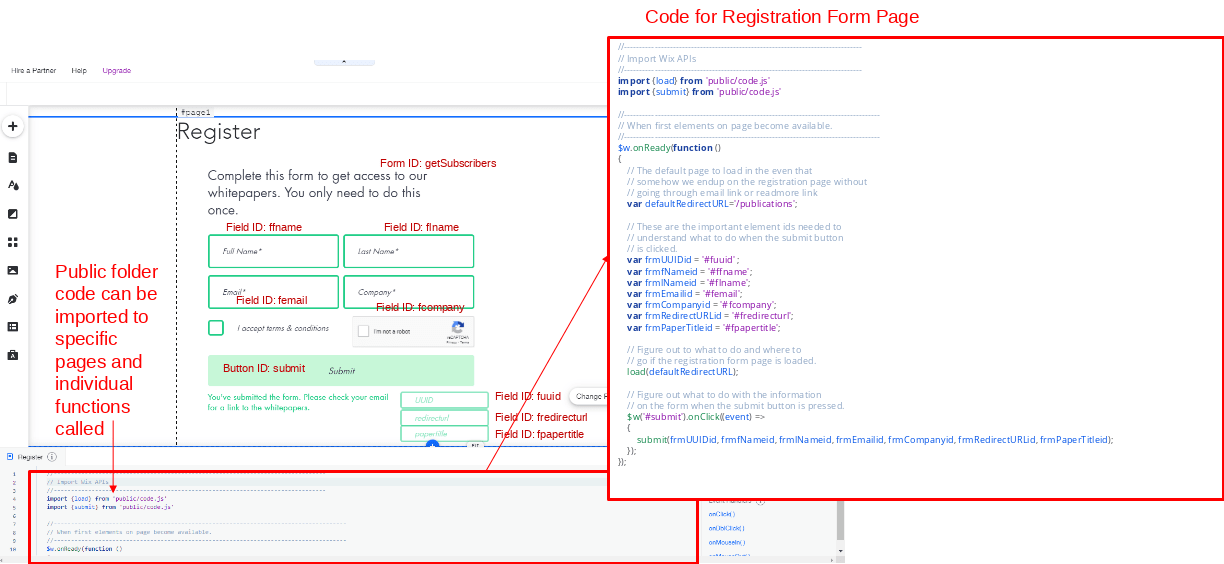
The code for this page is shown in the listing below. Two functions, load() and submit() are imported from code.js.
2.5. Contacts Database (WIX Server side)
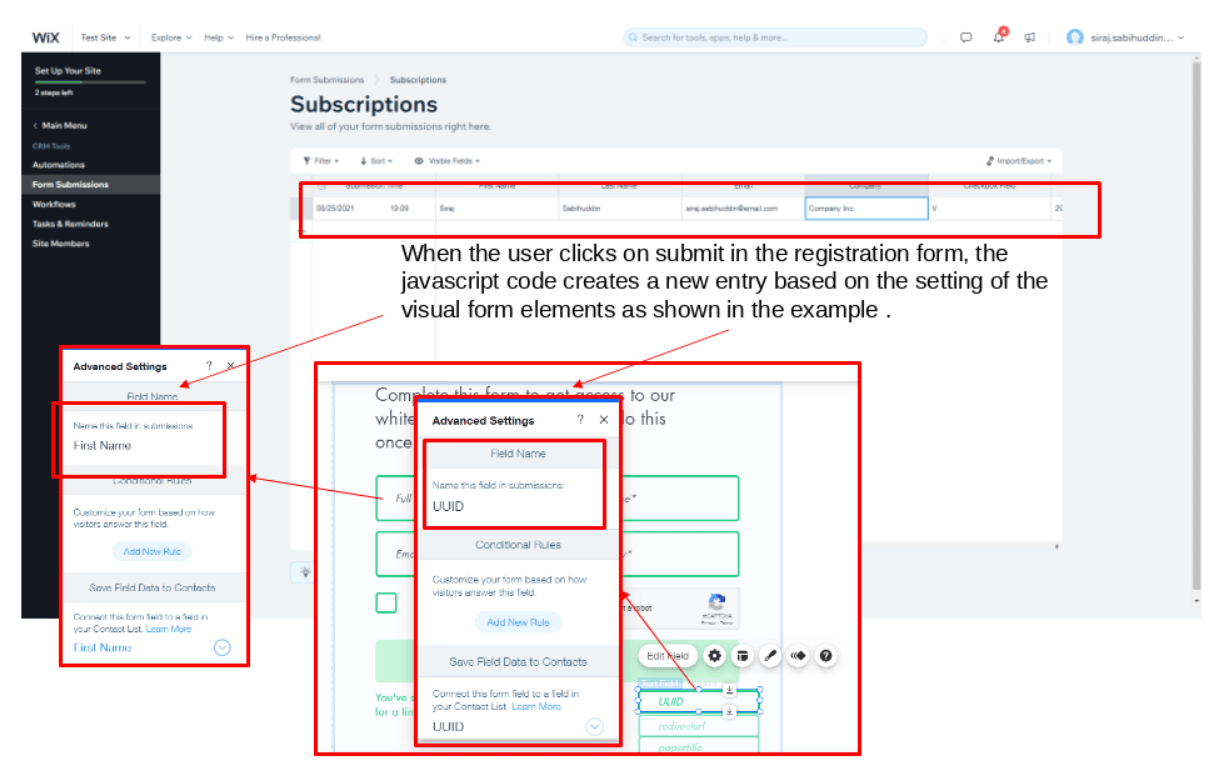
When setting up the registration form from the previous section, it is possible to link them to the WIX contacts database. As the form is submitted the user filled registration form details are populated into this CRM.
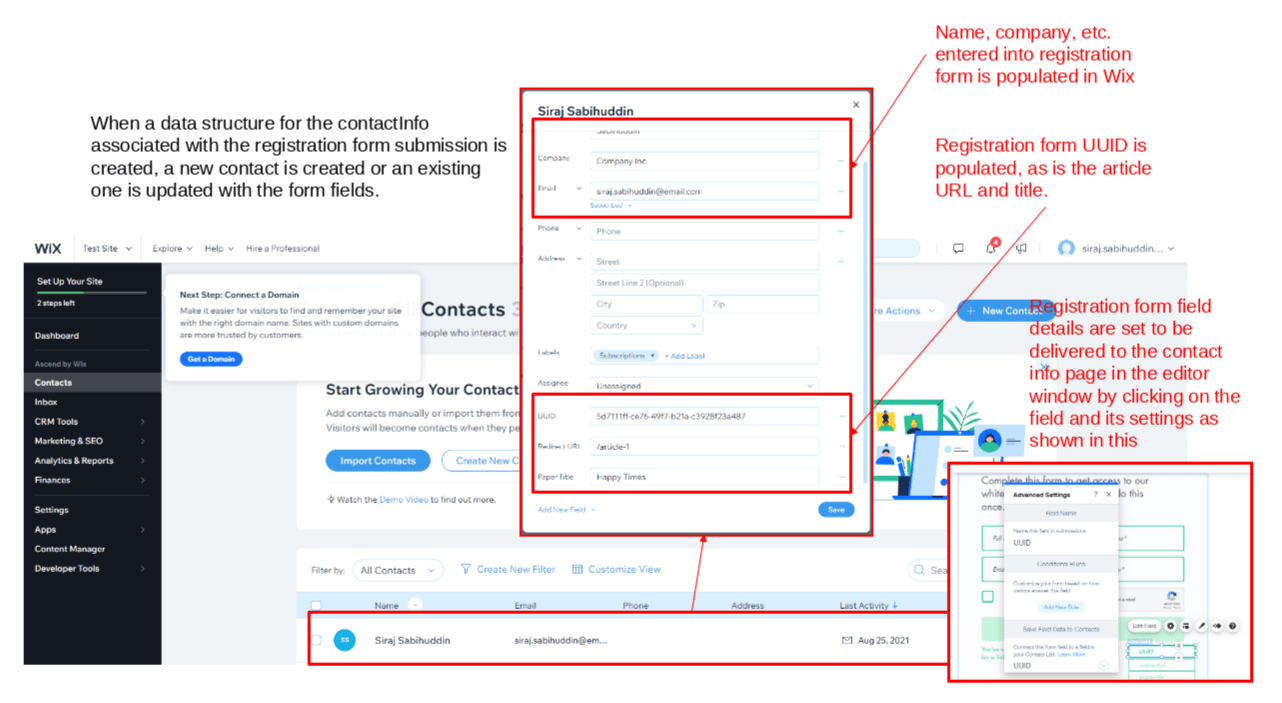
In addition to creating an entry with contact information, the earlier CRM javascript code, upon clicking submit in the registration form, also creates a subscriptions database entry that represents some of the form parameters passed in by the user. This is stored on the WIX backend.
2.6. Automations and Email Templates
As in the previous Version 1 WIX webpage design, we need to create an automation to trigger when a form is submitted. This trigger action from the automation will cause an email to be sent. The email has a customized template which will be populated by specific form variables such as the name of the person who registered using the form.
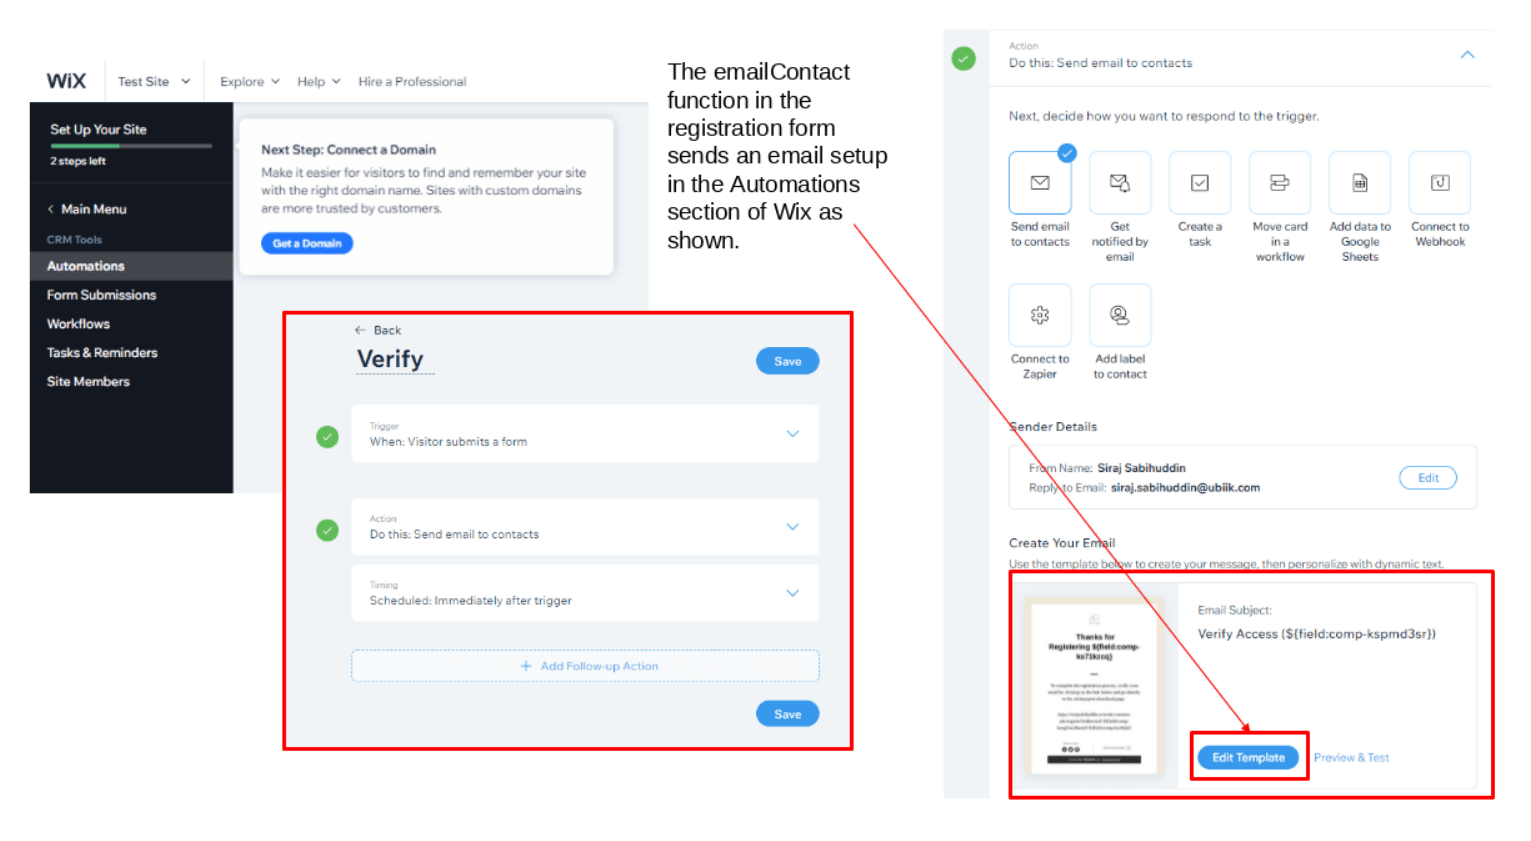
Figure 18 below shows how I created the template and setup some of the variables from the form created earlier in the registration page. The resulting email automatically generated by our code would arrive at the user end as shown on the right of the image.
2.7. Checking Cookies & URL Params.
In order to verify that cookies (in this case as stored in local storage) were being set correctly its possible to go to the browser web tools and navigate to the Application or Storage tab (depending on browser). In order to test modifications to the code, it is necessary to delete these cookies sometimes.
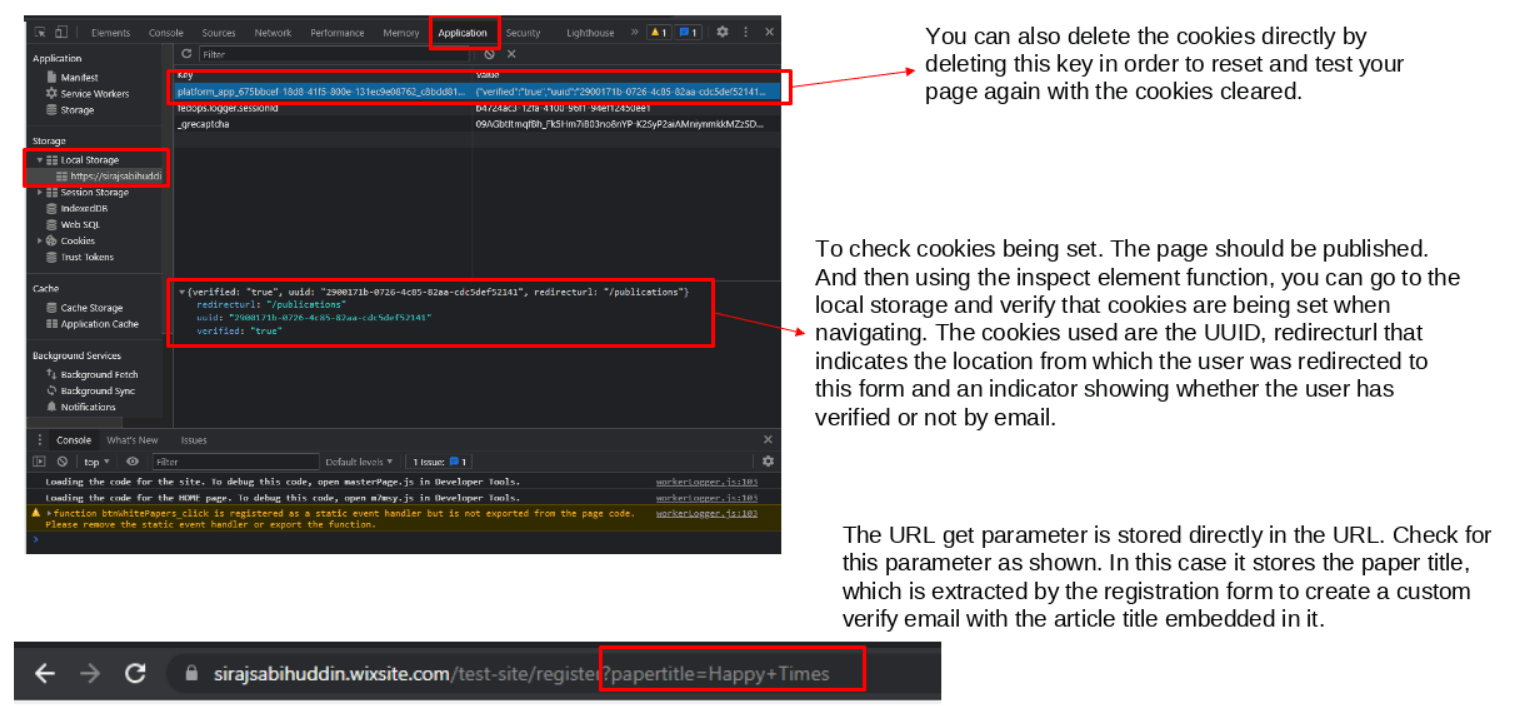
Likewise we can verify that the article pagetitle URL variable is being set correctly by looking at the URL directly.
3. Version 3: Adding Anchors
From version 2 of the code, I’ve modified further to add an additional URL variable that can be used to set an anchor location in the publications page. For this example I use the production page as opposed to the test page I developed in earlier examples. Figure 20 below shows the flowchart for this updated code.
3.1. Setting up Webpage Elements & Automations
On the publications page we setup elements as follows in Figure 22. When the user visits the webpage and he or she navigates to the Publications page, a list of articles will show up. Each article is assigned element IDs (with numbers incrementally increasing e.g. #title1 for the first article, #title2 for the second and so on). An anchor is set at the beginning of each article labelled #anchor1 for the first article and #anchor2 for the second article and so on.
Similar, to the publications page I also setup a new form. This form is shown in figure 23 below. As with the previous registration form from version 2, some hidden form elements are used to store additional data for populating the backend WIX database and for customizing emails sent to the user filling out the form.
Finally, one additional change is made to the WIX automations, email template as shown below in figure 24.

3.2. Public Folder Code
As previously done, most code can be moved into the public folder in a single javascript file called code.js. This code can be downloaded below.
The code contains an additional function as compared with the code shown in version 2. Additionally, some changes are made to accommodate the additional anchor functionality.
3.2.1. Imports
3.2.2. The Scroll Page function
The below code grabs the anchor id in the url and scrolls to that location. The normal approach to hash based html anchoring doesn’t work in wix so we need a workaround.
3.2.3. The Redirect Function
This function replaces all read online button links with a link to the registration page. If the user has been verified the links are not replaced and the user can access the publications.
3.2.4. The Submit Function
This function defines what happens when the submit button is pressed.
3.2.5. The Verify Function
This function checks and verifies the user. If the user has a link id matching the id stored in the cookie then set cookie as verified, else set to false
3.2.6. Generate UUID Function
This function generates a randomized UUID as obtained from stackover flow. It remains the same as the previous version [3]
3.3. Publications Page Code
3.4. Registration Form Code
4. Conclusions and Future work
Well. That about covers it. I’ve presented some approaches for using WIX for web development and shown some examples of using JQuery with WIX. WIX is not a good platform for development and is suspect in its Israeli connection given the context of the Israeli genocide against Palestinians [2][7][8] and its potentially unethical business practices vis-a-vis employees [4][5][6]
I highly recommend against its use. But if you must use it, hopefully this article will help. With that said, we need to be aware of some weaknesses and future work that would need to be done to make this code a bit more resilient and secure:
- Cookie code currently not a completely exhaustive protection of publications from unverified access. This is not a ‘secure’ approach.
- This means that if users have a direct link to the particular publication, they can access it without verification. Verification only authenticates if users use the normal route of accessing the publication. That is they click on the publications link or the read more link on the website.
- Future work should focus on making this more secure. At the moment it seems unnecessary to put in this added work to learn the particulars of the WIX api.
- Some log messages need to be removed as well. These can potentially give unwanted information to savvy user.
References
- “Boycott WIX: Many people are not aware that WIX is an Israeli company. Respect the boycott of Israel & use a better website builder.” https://boycottwix.org/.
- “Text-Book Case of Genocide”: Top U.N. Official Craig Mokhiber Resigns, Denounces Israeli Assault on Gaza. Publisher: Democracy Now. November 1, 2023. https://www.democracynow.org/2023/11/1/craig_mokhiber_un_resignation_israel_gaza
- Stack Overflow. 2021. https://stackoverflow.com/questions/105034/how-to-create-a-guid-uuid/8809472#8809472
- Jack Power. “Wix ‘addressing’ internal messages on Israel-Hamas conflict”. 2023. Publisher: Irish Times. https://www.irishtimes.com/business/2023/10/28/wix-addressing-internal-messages-on-israel-hamas-conflict/
- Jack Power. “Internal Wix chat encouraged staff to support Israel’s ‘narrative’ in Hamas conflict.” 2023. Publisher: Irish Times. https://www.irishtimes.com/ireland/2023/10/24/internal-wix-chat-encouraged-staff-to-support-israels-narrative-in-hamas-conflict/
- Matt Fox. Irish woman sacked for Israel ‘terrorist state’ post. 2023. Publisher: BBC. https://www.bbc.com/news/articles/c88e2ewg37go
- Gaza: UN experts call on international community to prevent genocide against the Palestinian people. November 2023. Publisher: UN https://www.ohchr.org/en/press-releases/2023/11/gaza-un-experts-call-international-community-prevent-genocide-against
- UN rights office issues report on business activities related to settlements in the Occupied Palestinian Territory. 2020. Publisher: UN. https://www.ohchr.org/en/press-releases/2020/02/un-rights-office-issues-report-business-activities-related-settlements?LangID=E&NewsID=25542