My goal today is to try and do some data-scraping using google to grab some basic weather data. Though of-course this could also be applicable to any webpage and expanded quite easily beyond weather data. I’ll show two different approaches using a direct approach and another approach that controls a browser (via Selenium) to get access to the data after all dynamic HTML data has been rendered.
To help with this process I’ve used the following tutorials as well to help me pull together code that works:
- https://aris-pattakos.medium.com/advanced-web-scraping-concepts-to-help-you-get-unstuck-17c0203de7ab
- https://www.geeksforgeeks.org/how-to-extract-weather-data-from-google-in-python/
Introduction
Before starting, if you are interested in running the code, I have packaged it as a Jupyter Notebook file (.ipynb). To run this you will need to install Jupyter Notebook or extract the code from it. The advantage of using Jupyter is that I can directly embed documentation right into the code making it easier to remember what I was doing.
The first step in this process is some imports. In this case there are some basic tools we need for web scarping. The requests library provides tools for fetching HTML files from the web. Combined with a custom library directly from git called request_files that can be used to allow loading of a local HTML file as well. You can find the requests-file repository at: https://github.com/dashea/requests-file. To install it follow the instructions at: https://medium.com/i-want-to-be-the-very-best/installing-packages-from-github-with-conda-commands-ebf10de396f4. Finally BeautifulSoup allows for parsing of HTML data. The code below demonstrates the imports. Notice that the os library is being used to construct an absolute path.
For demonstration, we can start the process of by grabbing a city name from the Python console as follows.
When running the above snippet of code you should have a prompt as follows, which you can fill in with the city name and press enter as shown in the Jupyterlab screen shots below:


At this point we can take one of two approaches to extract the HTML and process it from a given google query.
- The first is a direct approach. This is a faster approach that directly uses a GET request for a particular URL. While I was attempting the direct approach I noticed a problem where the retrieved HTML file was different from the HTML that was displayed through the Inspect Element function on my browser.
- If this is the issue, the alternative approach sacrifices speed and efficiency by creating an actual browser instance of Chrome and then browsing and extracting the web page HTML after all dynamic content has been rendered. This is done programmatically.
So lets look at each of these approaches!
1. Direct Extraction Approach
At this point, after imports and after grabbing the city name, we can grab the input from the user for a particular location for which we want to grab weather data. The format of this data is important. URLs need to have spaces and the like properly converted to be recognizable to the requests library. So this must be done. Likewise we need to add language and locality information to the query to make sure we are searching and getting results in the right language. Finally we also need to make sure the right browser identifier is being used for the query.
It turns out that the head variable is very important to ensure that the direct method can grab the HTML data correctly. Without this the HTML from the direct get request will not match the Inspect Element. This approach basically instructs the server to deliver the webpage in a specific format as though the user were browsing from a standard web browser – as I understand it.
Now we are ready to grab the web data. Traditionally we would do this as shown below with the use of requests. This was if we were not going ahead and using a headless browser. Once the request is made using this approach we can store it and use it later for BeautifulSoup parsing.
Once the data has been collected we use Beautiful Soup to get the contents. We can make these prettier and display them as well. We see when we display the prettified version of the HTML fetched from google in this way that there is a big difference between the Inspect element version and the version obtained from direct request.
We can do this comparison by saving the prettified version. To save the file we need to reconstruct the local directory base path and store it. You can find out how to do this here: https://www.makeuseof.com/how-to-get-the-current-directory-in-python/.
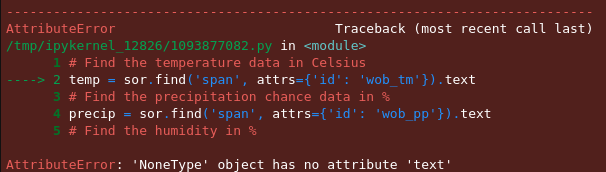
Now from here we can find the temperature using the id “wob_tm“. Likewise we an inspect the HTML and find other data such as the precipitation (“wob_pp“), humidity (“wob_hm“) and wind speed (“wob_ws“). These IDs are obtained by going to your browser and entering the search query we constructed earlier into the search engine (google in this case). Then inspecting the element associated with the displayed temperature, humidity, precipitation and wind data respectively.
In the case that we fail to add a header, the delivered HTML isn’t the same as that as we see when the header is included. Without the header (head variable in the earlier code) we need to look for the “BNeawe” class which is actually not present in the inspect element version of the HTML. Thus this second class is specific to the HTML fetched through the requests library.
The output of the above code should be as follows if all went well.

If things didn’t go so well. For instance, if the class or id could not be found you might get an error that looks like this – this might be the case if the head string is not used as the class names and ids between the delivered version through requests might be different from the one that you inspected via Inspect element in your browser:
2. Using a Headless Browser
There were some problems making get requests for a url. When the request is made without specifying the headers, it grabs the HTML delivered before all the javascript dynamic content is loaded. This makes it look very different from the Inspect Element (Browser function) version of the HTML sometimes which has very different HTML elements in the case of google than that delivered by requests.get(). To alleviate this problem at the cost of slowness, I’m using the selenium library to create a headless browser and control the browser directly to extract the final HTML. More details at: https://selenium-python.readthedocs.io/getting-started.html.
To use selenium, say with chromium, I need to also have a driver for chrome installed and placed in the appropriate path (in linux: /usr/bin or /usr/local/bin might be good locations). The same is needed for firefox, safari, edge, etc. The URL at: https://selenium-python.readthedocs.io/installation.html explains how to install selenium and get it running quickly.
Alternatively, we can use the browser approach with selenium. Here we grab the URL and do an element.
As with the previous direct attempt at data-scraping, we can extract the temperature, precipitation, humidity and wind speed data through selenium. The difference lies in making a call directly to chrome libraries and extracting the data through find_element_by_id.
Once the data has been captured we can close the selenium browser and end the program.
Download the Code
Want to try the code yourself? You can download it via my github page here: https://github.com/wandering3ngineer/python-tutorials. The relevant folder is located here: https://github.com/wandering3ngineer/python-tutorials/tree/main/Weather%20Data%20Scraping.
Included in the code are the chrome drivers. These drivers need to be placed in one of your path directories. Further included is an extracted_html.html file that contains a sample of the HTML obtained from the a URL request. This will be overwritten when you run the downloaded code. The goal of this file is to provide a reference to compare the Inspect element version of the HTML from the search query in the browser to the version obtained from a direct URL request. Finally, you will also find a weather-data-scraping.ipynb Jupyter Notebook file that you can run and play around with containing the code I’ve presented here. With that. Enjoy! … In the future we will take this example and make it a bit more sophisticated.
References
- Aris Pattakos. How to Scrape Websites That Don’t Want to Be Scraped. https://aris-pattakos.medium.com/advanced-web-scraping-concepts-to-help-you-get-unstuck-17c0203de7ab. May 19, 2020.
- Aditya Prasad. How to Extract Weather Data from Google in Python? https://www.geeksforgeeks.org/how-to-extract-weather-data-from-google-in-python/. June 21, 2021.
- David Shea. Request-File. https://github.com/dashea/requests-file. October 17, 2021.
- Frank Ceballos. Using the Command Line to Install Packages from GitHub. https://medium.com/i-want-to-be-the-very-best/installing-packages-from-github-with-conda-commands-ebf10de396f4. January 2, 2020.
- Idowu Omisola. How to Get the Current Directory in Python. https://www.makeuseof.com/how-to-get-the-current-directory-in-python/. September 29, 2020.
- Baiju Muthukadan, Selenium with Python. https://selenium-python.readthedocs.io/getting-started.html. Accessed: August 5, 2021.
- Baiju Muthukadan, Selenium with Python. https://selenium-python.readthedocs.io/installation.html. Accessed: August 5, 2021.
- Siraj Sabihuddin. Python-Tutorials. https://github.com/wandering3ngineer/python-tutorials. Accessed: August 5, 2021.